
Installing a smart lock can make everyday door access more convenient, but a successful installation depends on more than simply mounting the electronic lock and connecting an app. The door, existing locking mechanism, dimensions, alignment, hardware, and power requirements all need to be checked before the lock is configured.
In this complete smart lock installation guide, you will learn how to check whether your door is compatible, prepare the required tools, remove or work with the existing lock, install the new hardware step by step, calibrate the lock, configure access methods, and test the lock before relying on it for everyday use.
The guide also covers common installation problems, including bolt and strike misalignment, motor resistance, incorrect fitting, calibration issues, and situations where professional installation may be the safer option.
Smart Lock Installation: What You Need to Know
A smart lock installation involves more than mounting an electronic lock on a door. The installation must account for the existing locking mechanism, door dimensions, alignment, power requirements, and the manufacturer’s installation instructions.
Some smart locks are designed as retrofit devices that work with an existing lock, while others replace the existing lock completely. The installation process can therefore vary significantly from one product and door type to another.
Before beginning the installation, make sure you know what type of lock you have, whether the new smart lock is compatible with your door, what tools are required, and what backup access method will be available if the electronic system is unavailable.
Quick Answer:
You can install many smart locks yourself if the product is designed for your door and the installation does not require complex modification. A typical installation involves checking compatibility, removing or preparing the existing lock, installing the new hardware, connecting the electronic components, installing the battery, calibrating the lock, configuring the app, and testing every access method. For mortise modifications, non-standard doors, or difficult installations, professional installation may be the better option.
Smart lock installation is not simply a matter of replacing an old lock with a new electronic one. The result depends on whether the smart lock is compatible with your door, whether the existing locking mechanism is suitable, and whether the lock is installed and aligned correctly.
A properly installed smart lock should operate smoothly in both its mechanical and electronic functions. This means checking the door and lock dimensions before installation, fitting the hardware correctly, calibrating the locking mechanism, configuring the required access methods, and testing the lock before relying on it for everyday use.
In this guide, you will learn how to approach smart lock installation from start to finish—including door compatibility, required tools, installation steps, calibration, digital setup, post-installation testing, common installation problems, DIY versus professional installation, and installation costs.
Check Your Door Before Installing a Smart Lock
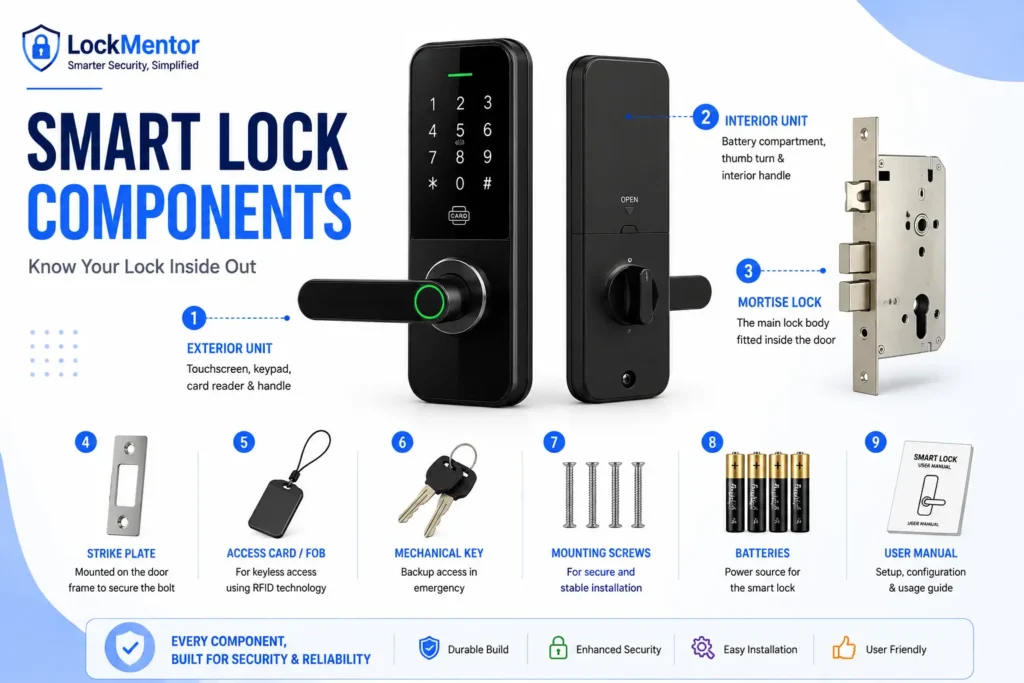
Before starting a smart lock installation, first confirm that the lock is physically compatible with your door. Smart locks are not universal, and compatibility can depend on the door thickness, existing lock mechanism, dimensions, door swing, and alignment between the lock and frame.
Spending a few minutes checking these details before removing the existing lock can prevent installation problems, unnecessary drilling, and the risk of purchasing a smart lock that cannot be properly fitted to your door.
Smart Lock Compatibility Checklist
| What to Check | Why It Matters |
|---|---|
| Door thickness | The lock must support the thickness range specified by the manufacturer. |
| Existing lock type | Determines whether the smart lock can be installed as a retrofit or requires replacement. |
| Backset | The latch or bolt position must match the door and compatible hardware. |
| Lock body dimensions | The new hardware needs sufficient space inside the door and surrounding area. |
| Door swing | Some locks require configuration for the direction in which the door opens. |
| Door-frame alignment | The bolt or latch must enter the strike without excessive resistance. |
| Existing holes and cut-outs | These can affect whether the new lock can be installed without modification. |
| Door material | Wood, metal, glass, aluminium, uPVC and other doors may have different installation requirements. |
| Exterior exposure | Outdoor-facing locks may have specific environmental limitations. |
Identify Your Existing Lock Mechanism
Look at the lock currently installed on the door before selecting the smart lock. It may use a mortise lock, rim lock, deadbolt, cylinder-based mechanism, or another configuration.
A retrofit smart lock may operate the existing mechanism, while a replacement model may require the existing lock body to be removed. The manufacturer’s compatibility information should be checked for the exact mechanism rather than relying only on the product’s general description.
Signs Your Door May Not Be Compatible
Stop and verify compatibility before proceeding if you notice any of the following:
- The door thickness is outside the manufacturer’s specified range.
- The existing locking mechanism is not listed as compatible.
- The lock body does not have enough space for the new hardware.
- The bolt or latch already requires excessive force to operate.
- The door is significantly misaligned with the frame.
- The installation requires drilling or cutting that is not covered by the manufacturer’s instructions.
- The door material or configuration is specifically excluded by the product documentation.
Note: Do not force a smart lock into an incompatible installation. If the existing door or lock mechanism does not meet the manufacturer’s requirements, choose a compatible model or consult a qualified installer.
Check Door and Frame Alignment
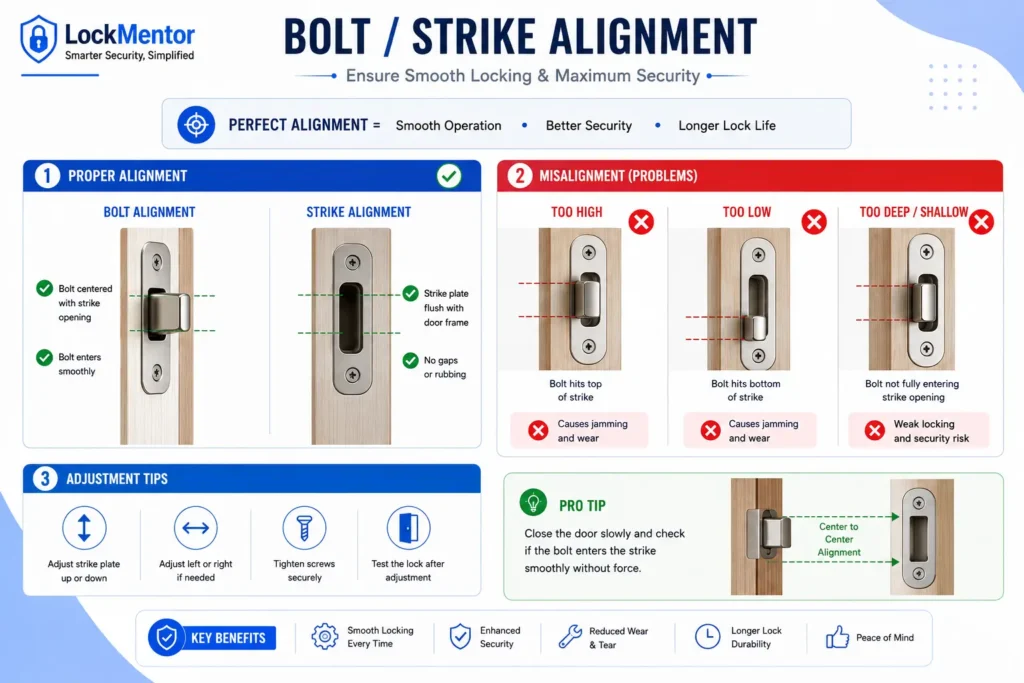
The door should close and the existing latch or bolt should operate smoothly before installing a motorized smart lock. If the bolt rubs against the strike plate or requires excessive force, the problem should be corrected first.
A motorized smart lock is not a substitute for proper door alignment. Excessive mechanical resistance can interfere with normal locking operation and may place unnecessary load on the lock’s motor and mechanism.
Tip: Before installation, lock and unlock the door manually several times. The bolt or latch should move smoothly without forcing the handle, key, or door.
Tools and Preparation
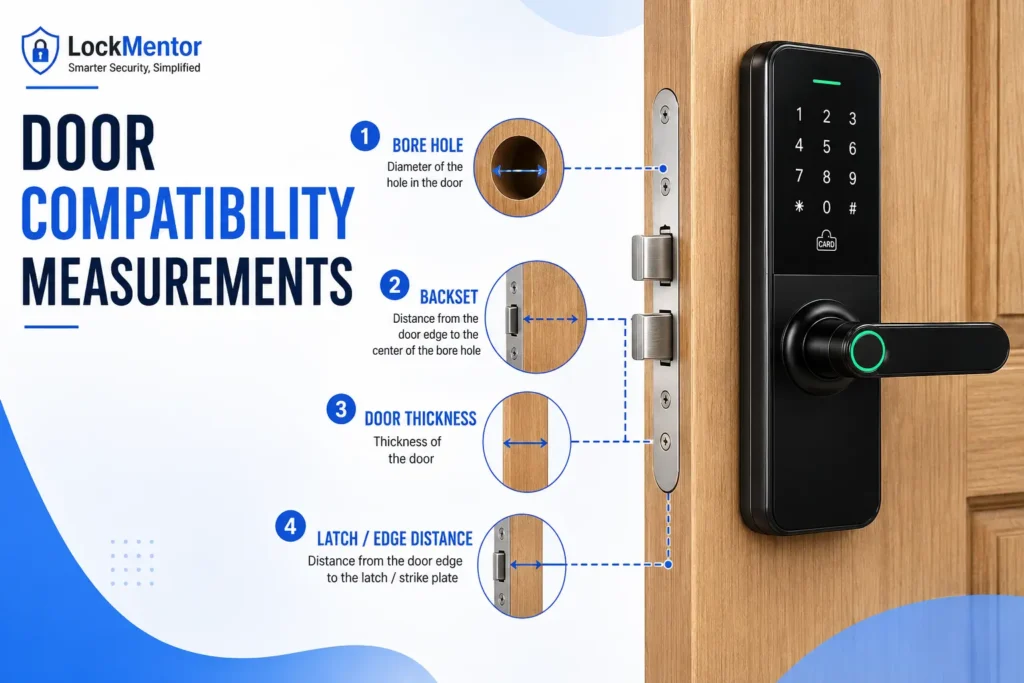
Before starting a smart lock installation, prepare the required tools, batteries, smartphone, and installation hardware. The exact requirements depend on the lock model and whether you are replacing an existing lock or modifying the door.
Many retrofit smart locks can be installed with basic hand tools, while installations that require new holes, mortise adjustments, or other door modifications may require additional equipment. Always check the manufacturer’s installation instructions before using power tools or modifying the door.
Basic Tools You May Need
- Phillips screwdriver: Commonly used for mounting screws and existing door hardware.
- Flat-head screwdriver: May be useful for removing certain hardware or adjusting components.
- Tape measure: Used to verify measurements such as door thickness and lock dimensions.
- Pencil: Useful for marking measurements or hole locations when permitted by the installation instructions.
- Manufacturer’s installation template: Some products provide a template for checking or marking door preparation.
Depending on the door and product, additional tools such as a drill, drill bits, hole saw, level, chisel, or hammer may be required. Do not assume that these tools are necessary for every smart lock.
Batteries and Electronic Preparation
Keep the batteries specified by the manufacturer ready before beginning the installation. Some smart locks use replaceable batteries, while others use rechargeable battery systems.
If the lock requires a smartphone application, install the correct app before starting the setup. Some connected models may also require a compatible hub or bridge for specific functions.
Tip: Keep the required batteries and your phone ready, but do not activate or configure the lock until the manufacturer’s installation procedure tells you to do so.
Keep the Mechanical Key or Backup Access Ready
If your smart lock includes a mechanical key or another emergency access method, identify it before completing the installation. Do not store the backup key inside the property where it cannot help you during an electronic failure.
Also identify the location of any emergency power contacts or other manufacturer-provided backup method before you close the door for the first time.
Read the Manufacturer’s Installation Manual First
Smart locks can look similar while having very different installation requirements. One model may be designed for a standard single-cylinder deadbolt, while another may be designed for a mortise lock, cylinder, or retrofit installation.
Read the installation instructions for your exact model before removing the existing lock. Pay particular attention to supported door dimensions, lock compatibility, mounting orientation, cable routing, battery type, calibration, and emergency access.
Note: A general smart-lock installation guide cannot replace the manufacturer’s instructions for your specific model. Product-specific dimensions and installation procedures always take priority.
Before You Remove the Existing Lock
Keep the door open while removing and installing the locking hardware. This reduces the risk of accidentally locking yourself out while the lock is partially disassembled.
It is also useful to photograph the existing installation before removing anything. Keep the original screws and hardware together until you have confirmed that the new smart lock has been installed and tested successfully.
Before proceeding, confirm that you have everything required:
- Compatible smart lock and mounting hardware
- Required tools
- Correct batteries or charged battery pack
- Smartphone and required application
- Manufacturer’s installation instructions
- Mechanical key or other backup access method
- Any required hub or bridge
Key Takeaway: The best preparation is to verify compatibility first, gather only the tools your specific installation requires, read the manufacturer’s instructions, and keep a reliable backup access method available before removing the existing lock.
How to Install a Smart Lock Step by Step
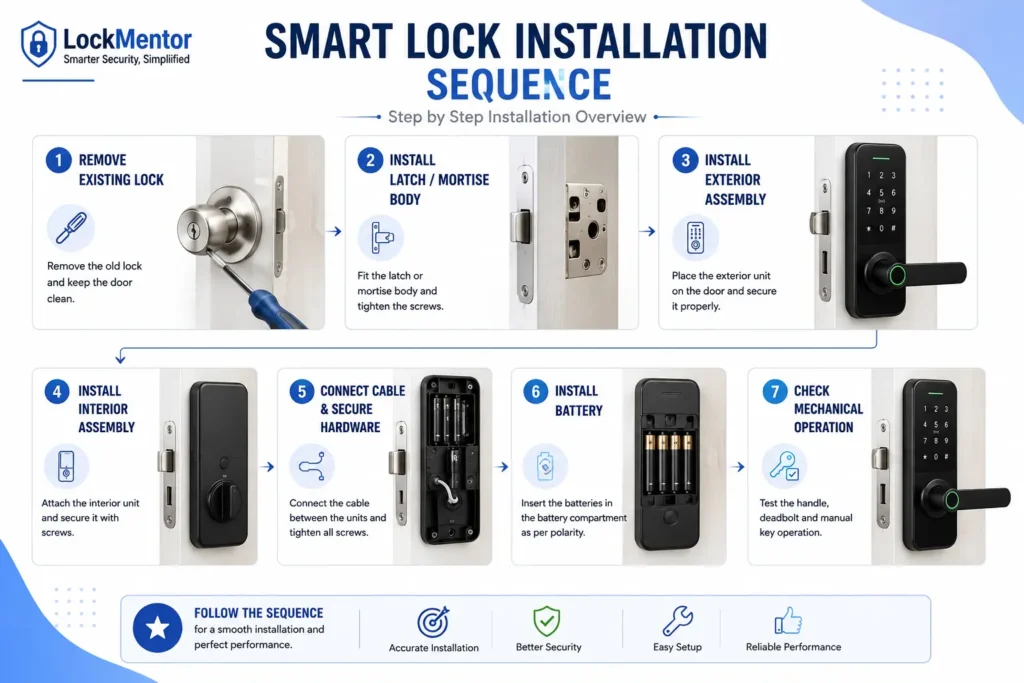
Once you have confirmed that the smart lock is compatible with your door and prepared the required tools, you can begin the physical installation. The exact procedure varies by lock design, so use these steps as a general framework and follow the manufacturer’s instructions for your specific model.
Keep the door open throughout the main installation process. This makes it easier to work on the lock and reduces the risk of accidentally locking yourself out before the electronic and emergency access functions have been tested.
Step 1: Remove the Existing Lock
Begin by removing the existing lock or the components that the new smart lock is designed to replace. Keep the screws and removed hardware together until the new installation has been fully tested.
If you are installing a retrofit smart lock, do not remove components that the new system is designed to use. Follow the manufacturer’s instructions to determine exactly which parts should remain in place.
Tip: Take a photo of the original lock assembly before removing it. This can help you understand the original orientation of the hardware if you need to troubleshoot the installation later.
Step 2: Install the Latch or Mortise Body
If the smart lock uses a replacement latch or mortise body, install it into the door according to the manufacturer’s orientation and dimensional requirements.
Make sure the latch or bolt moves freely before attaching the electronic components. It should not bind against the door edge or surrounding hardware.
If the installation requires cutting, drilling, or modifying the mortise pocket, use only the manufacturer’s specified dimensions. Significant door modification may be better handled by a qualified installer.
Step 3: Install the Exterior Assembly
Position the exterior portion of the smart lock on the outside of the door, ensuring that the keypad, fingerprint sensor, key cylinder, or other authentication components are correctly oriented.
If the lock includes a cable connecting the exterior and interior units, route the cable through the designated opening without twisting, crushing, or pinching it.
Step 4: Install the Interior Assembly
Position the interior assembly against the inside of the door and align it with the mounting points and locking mechanism. The exact mounting arrangement varies between products.
Tighten the mounting screws evenly according to the manufacturer’s instructions. Avoid overtightening because excessive pressure can affect the movement of the lock mechanism or damage the mounting hardware.
Step 5: Connect the Cable and Secure the Hardware
Connect the electronic cable or connector between the lock components as specified by the manufacturer. Make sure the connector is fully seated and that the cable is positioned where it will not interfere with moving parts.
Before installing the battery, check that the exterior and interior assemblies are firmly mounted and that the mechanical locking mechanism can still move smoothly.
Note: Never force an electronic connector into position. If a connector does not fit or its orientation is unclear, stop and check the manufacturer’s installation documentation.
Step 6: Install the Battery
Install the specified batteries or rechargeable battery pack according to the manufacturer’s instructions. Check the polarity and make sure the battery compartment is properly closed.
Do not assume that every smart lock uses the same battery type or installation procedure. Use only the power source specified for your particular model.
Step 7: Check the Mechanical Operation
Before connecting the lock to the app or relying on electronic access, test the physical mechanism while the door is still open. Operate the lock according to the manufacturer’s instructions and confirm that the latch or bolt moves smoothly.
If the mechanism feels tight, rubs against the strike, or requires excessive force, stop and correct the mechanical problem before continuing with electronic setup.
Key Takeaway: Do not use the app or motor calibration to compensate for a mechanically misaligned door. The lock should operate smoothly before electronic configuration begins.
Calibrate and Configure the Smart Lock
After the physical installation is complete, the smart lock needs to be calibrated and configured before it is used for everyday access. Calibration allows the electronic system to determine how the locking mechanism operates, while configuration sets up the users, authentication methods, and supported smart features.
The exact setup procedure varies by manufacturer and model. Follow the product’s instructions for calibration, app pairing, administrator setup, and credential enrollment rather than assuming that every smart lock uses the same process.
Why Calibration Matters
A motorized smart lock needs to operate the latch or bolt without unnecessary resistance. Calibration helps the lock understand the required movement and position of its locking mechanism according to the manufacturer’s design.
If the door is physically misaligned, calibration may fail or the motor may struggle during operation. Therefore, calibration should be performed only after confirming that the lock moves smoothly in its mechanical state.
Note: Calibration cannot fix a fundamentally misaligned door or incorrectly installed locking mechanism. Correct the physical installation first if the bolt or latch does not move smoothly.
How to Calibrate the Smart Lock
Put the lock into its calibration or handing procedure according to the manufacturer’s instructions. Some models perform calibration automatically through the setup process, while others require a specific command from the keypad, interior control, or mobile application.
During calibration, keep the door in the position specified by the manufacturer and avoid manually forcing the lock. Wait until the calibration process has completed before testing normal electronic operation.
Set Up the Administrator Account
If the smart lock uses a mobile application or online account, create and secure the administrator account before adding other users. The administrator account may control important functions such as user credentials, settings, access history, and connected features depending on the product.
Use a strong, unique password and enable additional account-security features when supported by the manufacturer.
Add PINs, Fingerprints or Other Credentials
Once the administrator setup is complete, enroll the access methods supported by your smart lock. These may include PIN codes, fingerprints, RFID/NFC credentials, smartphones, or other authentication methods.
Add only the credentials that are actually needed. If the lock supports multiple users, give each regular user an appropriate credential rather than sharing one administrator credential with everyone.
Tip: Test each newly enrolled credential while the door remains open. This makes it easier to correct an enrollment problem without creating an access issue.
Connect the App and Optional Network Features
Pair the smart lock with its official mobile application according to the manufacturer’s instructions. Depending on the product, Bluetooth may be used for local setup while Wi-Fi, a hub, or another network connection may be required for additional connected features.
Do not assume that every function requires an internet connection. Check the manufacturer’s documentation to understand which features work locally and which depend on a network or online service.
Because smart locks can use different connectivity technologies and network configurations, see our Wi-Fi vs Bluetooth vs Matter Smart Locks guide for a detailed comparison.
Configure Auto-Lock and Other Settings
Configure optional features such as auto-lock, notifications, user permissions, access schedules, or other supported settings according to your requirements.
Avoid enabling features simply because they are available. For example, auto-lock should be configured only after you understand how quickly it activates and how users will regain access if the door is unintentionally locked.
Key Takeaway: Complete the process in this order: physical installation → mechanical check → calibration → administrator setup → user credentials → app/network configuration → final testing.
Test the Smart Lock After Installation
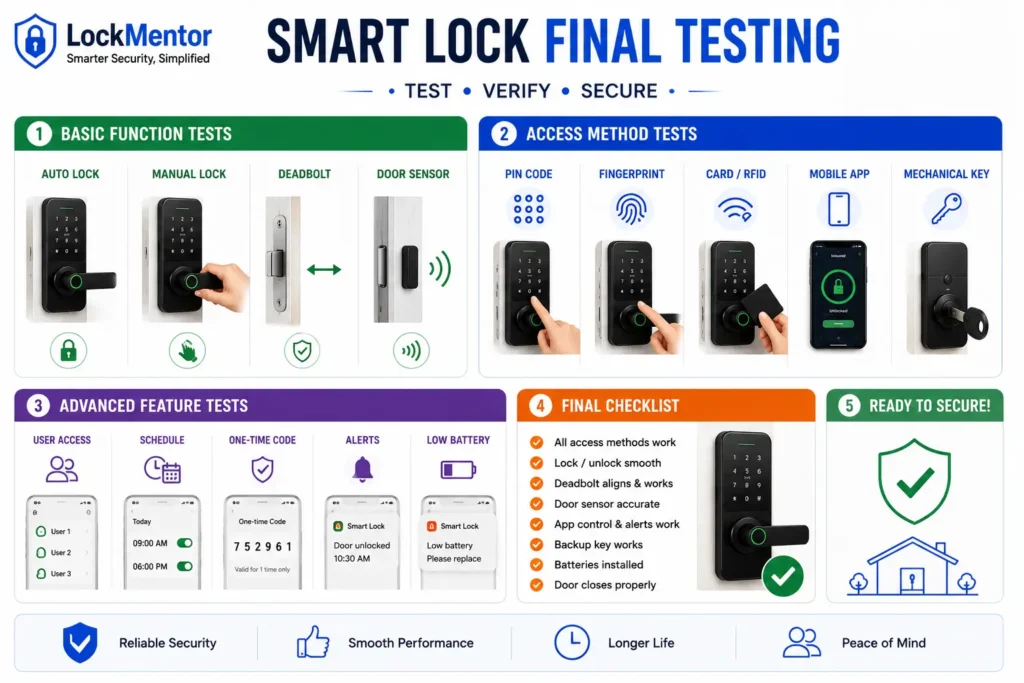
Do not consider a smart lock installation complete immediately after the lock powers on or connects to the mobile app. The physical mechanism, electronic authentication, and backup access methods should all be tested before the door is used normally.
Perform the initial tests with the door open. Once the lock operates correctly in this condition, repeat the important tests with the door fully closed and verify that the bolt or latch enters the strike without excessive resistance.
Smart Lock Installation Testing Checklist
| Test | What to Check |
|---|---|
| Manual operation | The latch or bolt moves smoothly without excessive force. |
| PIN access | A correctly programmed PIN unlocks the door as expected. |
| Fingerprint | An enrolled fingerprint is recognized correctly, where supported. |
| Smartphone access | The official app can lock or unlock the device as supported. |
| RFID/NFC | The programmed credential works correctly, where supported. |
| Auto-lock | The configured auto-lock function operates according to its settings. |
| Emergency access | The documented backup access method is available and understood. |
| Mechanical override | The physical key or other mechanical backup works, where provided. |
| Closed-door operation | The bolt or latch aligns correctly with the strike when the door is closed. |
Test Manual Locking and Unlocking
Start by checking the mechanical operation. Lock and unlock the mechanism according to the manufacturer’s instructions and confirm that it moves smoothly.
If the bolt requires excessive force, rubs against the strike, or stops before reaching its normal position, do not continue with repeated motorized testing. Investigate the alignment or installation first.
Test Every Configured Access Method
Test each authentication method that you intend to use regularly. For example, if you have configured a PIN, fingerprint, and smartphone access, verify each one individually rather than assuming that successful app pairing means every method has been configured correctly.
If multiple people will use the lock, each user’s credential should also be tested before the installation is considered complete. For a detailed comparison of fingerprint and PIN authentication, see our Fingerprint and PIN code smart lock guide, which covers security, reliability, privacy and practical access management.
Test the Emergency Access Method
Confirm that you understand how to regain access if the primary electronic system becomes unavailable. Depending on the model, this may involve a mechanical key, emergency power connection, backup credential, or another manufacturer-supported method.
Do not wait for a real battery or electronic failure to discover how the emergency procedure works.
Note: Only test an emergency procedure in the manner described by the manufacturer. Do not deliberately disable or damage the lock to simulate a failure.
The Most Important Test: Lock It With the Door Closed
After the initial tests with the door open, close the door normally and test the locking mechanism again. The bolt or latch should align with the strike and operate without excessive resistance.
This test is important because a lock can appear to work correctly while the door is open but struggle when the door is actually closed. If the motor strains or the bolt does not fully engage, check the door and frame alignment before relying on the smart lock.
Tip: Perform several lock-and-unlock cycles with the door closed. The mechanism should remain smooth and consistent rather than becoming progressively harder to operate.
Final Installation Check
Before finishing, confirm that the smart lock is securely mounted, cables are not being pinched, the battery compartment is properly closed, the configured credentials work, and the emergency access method is known.
Key Takeaway: A successful installation means more than a powered-on lock. The smart lock should lock, unlock, authenticate, calibrate, and provide a known backup access method without excessive mechanical resistance.
Installation Problems: Diagnose Them Before You Finish
Some smart-lock problems appear immediately after installation and are usually related to compatibility, alignment, mounting, wiring, or calibration. These should be addressed before the lock is put into everyday service.
This section focuses specifically on problems caused or discovered during installation. For general smart-lock problems that occur during everyday use, see our complete Smart Locks guide.
The Smart Lock Does Not Fit
If the new lock does not physically fit the door, do not force the hardware into place. Check the manufacturer’s compatibility requirements against the door thickness, existing lock mechanism, backset, mounting holes, and available space.
If the product requires dimensions or door preparation that your door does not provide, a different compatible model may be necessary. Avoid modifying the door until you have confirmed the manufacturer’s required dimensions.
The Bolt Does Not Align With the Strike
If the bolt does not enter the strike plate smoothly when the door is closed, first check the door and frame alignment. The strike position, door sag, latch position, or installation of the lock body may need attention.
Do not repeatedly force a motorized lock against a misaligned strike. Correct the underlying mechanical alignment before continuing calibration or normal operation.
Tip: Test the bolt with the door open first, then with the door closed. If it works freely when open but struggles when closed, investigate the door-to-frame alignment.
The Motor Struggles or Makes Unusual Noise
A motor that repeatedly strains, stalls, or produces unusual sounds during the first installation tests may indicate excessive mechanical resistance, incorrect assembly, or an alignment problem.
Check that the latch or bolt moves freely by the manufacturer’s specified method and verify that the mounting hardware is correctly positioned. If the problem remains, stop using the motor and consult the product’s installation instructions or qualified support.
The Lock Works With the Door Open but Not Closed
This is a strong indication that the installation may have an alignment or strike-position problem. When the door is open, the bolt may move freely because it does not need to enter the frame-mounted strike.
Close the door slowly and observe where the bolt or latch contacts the strike. Correct the mechanical alignment before repeating motorized locking cycles.
Calibration Fails After Installation
If calibration fails immediately after installation, first verify that the lock was installed in the correct orientation and that the mechanical mechanism moves smoothly.
Also confirm that the battery is correctly installed and that all required cables or connectors are properly connected. If the manufacturer’s calibration procedure still fails, follow the model-specific troubleshooting instructions rather than repeatedly forcing the mechanism.
The Interior and Exterior Units Do Not Mount Correctly
If the two sides of the smart lock do not align correctly, check the mounting plate, spindle, cable routing, and mounting holes against the manufacturer’s installation diagram.
Do not tighten the hardware in an incorrect position simply to make the lock appear secure. Incorrect mounting can affect both the mechanical operation and electronic components.
Note: If installation requires drilling, cutting, or significant modification that is not covered by the manufacturer’s instructions, stop and consider professional installation rather than improvising the mounting arrangement.
When Should You Stop the Installation?
Stop the installation and check the manufacturer’s documentation or seek professional assistance if the lock is incompatible with the door, requires unexpected modification, cannot be aligned correctly, has damaged components, or the motor continues to struggle after the mechanical installation has been checked.
Key Takeaway: Most installation-stage problems should be solved at the mechanical level first. Do not use software settings, repeated calibration, or motor operation to compensate for an incorrectly fitted or misaligned lock.
DIY or Professional Smart Lock Installation?
Whether you should install a smart lock yourself depends mainly on the lock type, door compatibility, installation complexity, and whether the door needs modification. A straightforward retrofit installation may be manageable for someone comfortable with basic tools, while a mortise replacement or non-standard door may require professional expertise.
Before deciding how to install a smart lock, it is also useful to understand how it compares with a traditional lock in terms of security, reliability, convenience, maintenance and access control. See our smart lock vs traditional lock guide for a detailed comparison.
The goal should not be to complete the installation as quickly as possible. A smart lock needs to operate smoothly and reliably, so choosing the right installation method is part of getting the security system right.
When DIY Installation Makes Sense
DIY installation may be reasonable when the smart lock is specifically designed for your existing door and the installation requires only basic hardware replacement or retrofit work.
- The manufacturer confirms that your door and lock are compatible.
- The installation does not require significant drilling or cutting.
- You are comfortable using basic hand tools.
- The installation instructions are clear and model-specific.
- The existing door and lock are already properly aligned.
- You can test the lock and its emergency access method after installation.
Tip: A simple retrofit installation can be a good DIY project, but only after confirming the exact compatibility requirements for the specific smart lock.
When to Hire a Professional
Professional installation is preferable when the door requires structural or mechanical modification, the locking mechanism is complex, or you are unsure whether the smart lock can be correctly fitted.
- The installation requires significant drilling, cutting, or chiselling.
- A mortise lock needs modification or replacement.
- The existing door or frame is significantly misaligned.
- The door uses a non-standard locking mechanism.
- The lock is being installed on a security-sensitive or commercial door.
- The manufacturer’s instructions require professional installation.
- You do not have the tools or experience required for the installation.
When Door Modification Is Required
Some smart locks are designed to fit existing hardware, while others require new mounting holes, changes to the mortise, or modification of the door or frame.
Before drilling or cutting, confirm the exact dimensions and installation method specified by the manufacturer. Incorrect door preparation can permanently affect the door and may prevent the smart lock from operating correctly.
Note: Do not modify a door based only on a generic installation diagram found online. Use the installation documentation for the exact smart-lock model.
DIY vs Professional Installation
| Installation Situation | Recommended Approach |
|---|---|
| Compatible retrofit smart lock | DIY may be suitable |
| Simple replacement with existing compatible hardware | DIY may be suitable |
| Standard mortise replacement | Professional recommended if modification is required |
| Non-standard door or lock mechanism | Professional recommended |
| Significant drilling or cutting | Professional recommended |
| Commercial or security-sensitive door | Professional installation generally preferable |
| Door already has alignment problems | Correct the mechanical problem before installation |
What to Look for in a Smart Lock Installer
If you choose professional installation, look for an installer who understands both the mechanical locking system and the specific smart-lock product. The installer should be able to verify door compatibility, correctly align the locking mechanism, and complete the manufacturer’s required setup and testing.
Before the installer leaves, confirm that the lock has been tested with the door closed and that you understand the normal and emergency access procedures.
Key Takeaway: Choose DIY installation when the product is clearly compatible and requires straightforward fitting. Choose professional installation when the door is non-standard, modification is required, alignment is problematic, or the consequences of an installation error are significant.
Smart Lock Installation Cost
The cost of smart lock installation depends on more than the price of the lock itself. The total cost can vary according to the lock type, existing door hardware, installation complexity, required door modifications, location, and whether you choose DIY or professional installation.
A straightforward retrofit installation may require relatively little additional work, while replacing or modifying a mortise lock or fitting a smart lock to a non-standard door can require more time and specialist labour.
What Determines Smart Lock Installation Cost?
| Cost Factor | How It Can Affect Installation |
|---|---|
| Lock type | Different smart-lock mechanisms can require different installation procedures. |
| Retrofit vs replacement | A retrofit installation may require less physical modification than a complete lock replacement. |
| Door compatibility | Non-standard dimensions or mechanisms may require additional work. |
| Mortise work | Cutting, chiselling, or modifying a mortise can increase labour requirements. |
| Door alignment | Existing alignment problems may need to be corrected before the smart lock can be installed properly. |
| Professional labour | Installation charges vary by installer, location, complexity, and service requirements. |
| Additional hardware | Adapters, mounting components, replacement cylinders, or other compatible hardware may add to the total cost. |
DIY Smart Lock Installation Cost
With a compatible retrofit or straightforward replacement, DIY installation can reduce labour costs because the installation is performed by the owner.
However, DIY does not mean there is no installation cost. You may still need tools, replacement hardware, batteries, adapters, or other components depending on the door and smart-lock model.
Tip: Compare the total DIY cost—including required tools and additional hardware—not just the advertised price of the smart lock.
Professional Smart Lock Installation Cost
Professional installation costs can vary significantly because installers may charge differently depending on the location, lock type, door preparation, travel, labour time, and additional work required.
Ask for the scope of work before agreeing to a price. In particular, confirm whether the quoted installation includes removal of the existing lock, door modification, fitting, calibration, app setup, testing, and any additional hardware.
Installation Costs in India, the UK and the US
Installation pricing is highly location-dependent, so a price quoted for one country or city should not be treated as a universal smart-lock installation cost.
In India, the final cost can depend heavily on the type of Indian door and whether mortise or other hardware modification is required. In the UK and US, labour rates, local service charges, existing lock standards, and the type of door hardware can similarly affect the final price.
For an accurate current price, obtain a quote for the specific smart lock and specific door rather than relying on a generic online estimate.
Note: Installation prices change over time and vary by location. Do not use an old online price as a current guaranteed installation rate.
How to Compare Smart Lock Installation Quotes
When comparing professional installation quotes, make sure you are comparing the same scope of work. A lower quote may not include door modification, removal of existing hardware, additional components, calibration, or final testing.
- Ask whether lock removal is included.
- Confirm whether door modification is included.
- Check whether additional hardware is charged separately.
- Confirm whether calibration and configuration are included.
- Ask whether final testing is included.
- Check warranty or service terms for the installation work.
Key Takeaway: The real cost of smart lock installation is determined by the lock + door compatibility + required modification + labour + additional hardware. Get a quote based on your specific door rather than choosing an installer solely on the lowest advertised price.
Smart Lock Installation in India
Smart lock installation in India can vary considerably because residential doors may use different materials, lock mechanisms, thicknesses, and installation practices. A smart lock that fits a standard door in one market may not necessarily fit an Indian door without checking the existing hardware and dimensions.
For this reason, Indian buyers should confirm the compatibility of the specific smart lock with their door before purchasing or starting installation. The most important checks include the door thickness, existing lock mechanism, mortise or mounting dimensions, door alignment, and whether the manufacturer provides installation support for the particular door configuration.
Smart Locks on Indian Wooden and Main Doors
Wooden entrance doors are common in Indian homes, but their construction and existing hardware can vary significantly. A door may use a mortise lock, rim lock, cylinder-based mechanism, or another configuration.
Before installation, check the door thickness, existing lock body, available mounting space, and alignment with the frame. Heavy or non-standard doors may also require careful selection of the compatible smart-lock mechanism.
Mortise and Rim Lock Compatibility
Mortise and rim-lock configurations require particular attention because smart locks designed for one mechanism may not directly fit another. Some products are designed to replace a compatible mortise lock, while others are designed to work with or retrofit an existing mechanism.
Do not assume that a product advertised as a “smart door lock” will fit every mortise or rim-lock configuration. Check the manufacturer’s compatibility specifications for the exact lock body and door dimensions.
Note: In India, the term “mortise smart lock” can refer to products with different physical configurations. Always verify the actual lock-body dimensions and installation requirements instead of relying only on the product category name.
For India-specific information on products covered by compulsory BIS certification and applicable Quality Control Orders, refer to the BIS list of products under compulsory certification .
Installation and After-Sales Support in India
For a complex installation, manufacturer or authorised installer support can be valuable. This is particularly relevant when the door requires drilling, mortise modification, replacement of existing hardware, or adjustment of the door and frame.
Before purchasing, check whether installation service is available in your city and whether the manufacturer provides installation support, replacement parts, warranty service, and technical assistance for the selected model.
India Smart Lock Installation Checklist
| Check Before Installation | What to Confirm |
|---|---|
| Door material | Confirm that the lock is suitable for the door construction. |
| Door thickness | Confirm that it falls within the manufacturer’s supported range. |
| Existing mechanism | Identify whether the door uses a mortise, rim, deadbolt, cylinder, or another mechanism. |
| Lock dimensions | Compare the existing hardware and mounting dimensions with the smart lock specifications. |
| Door alignment | Make sure the door closes and the bolt or latch moves without excessive resistance. |
| Installation method | Determine whether the lock is retrofit, replacement, or requires door modification. |
| Service availability | Check whether manufacturer or authorised installation support is available locally. |
Key Takeaway: For Indian doors, do not choose a smart lock based only on its features or appearance. First verify the existing lock mechanism, door dimensions, compatibility, alignment, installation method, and availability of local support.
Smart Lock Installation Safety Checklist
Before considering the installation complete, run through a final safety check. The objective is to make sure the smart lock is securely fitted, operates without excessive mechanical resistance, and does not leave you dependent on a single electronic access method.
For a broader look at smart-lock security beyond installation, including hacking risks, privacy, authentication, physical security, and digital protection, see our Are Smart Locks Safe? Hacking, Privacy & Security Explained guide.
Before Installation
- Confirm that the smart lock is compatible with your exact door and locking mechanism.
- Read the manufacturer’s installation instructions for the specific model.
- Prepare the required tools and correct batteries or battery pack.
- Keep the door open while removing and installing the lock.
- Keep the mechanical key or other backup access method available where applicable.
During Installation
- Do not force incompatible hardware into the door.
- Do not force the latch or bolt if it does not move smoothly.
- Route electronic cables so they are not pinched or damaged.
- Do not overtighten mounting screws.
- Follow the manufacturer’s specified drilling or cutting dimensions if modification is required.
- Stop if the installation differs significantly from the manufacturer’s instructions.
After Installation
- Check that the lock is securely mounted.
- Verify that the latch or bolt moves smoothly.
- Complete the required calibration procedure.
- Test every configured access method.
- Test the emergency or mechanical backup access method where provided.
- Test the lock with the door fully closed.
- Confirm that the bolt enters the strike without excessive resistance.
Key Takeaway: Never rely on a smart lock simply because the electronics are working. A safe installation requires correct mechanical fitting, smooth operation, proper calibration, tested access methods, and a known backup access procedure.
Frequently Asked Questions About Smart Lock Installation
Can I install a smart lock myself?
Yes, many smart locks can be installed as a DIY project when the product is compatible with your door and the installation requires only straightforward hardware replacement or retrofit work. If the installation requires significant drilling, cutting, mortise modification, or complex door adjustment, professional installation may be more appropriate.
Can a smart lock be installed on any door?
No. Smart locks are not universally compatible with every door. Compatibility can depend on door thickness, existing lock mechanism, backset, mounting dimensions, door material, door swing, and alignment. Always check the manufacturer’s specifications for your exact door configuration before purchasing.
Do smart locks require drilling?
Not always. Some retrofit smart locks are designed to use existing hardware and may require little or no new drilling. Other models may require new mounting holes or door modification. The installation requirements depend on the specific lock and door.
How long does smart lock installation take?
Installation time varies according to the lock design, existing door hardware, compatibility, and whether modification is required. A straightforward retrofit can be relatively quick, while mortise replacement or non-standard door preparation can take considerably longer.
Can I install a smart lock without replacing my existing lock?
Some smart locks are specifically designed as retrofit systems and can operate an existing compatible locking mechanism. Others are complete replacement locks. Check the manufacturer’s compatibility requirements before assuming that your existing lock can be retained.
Why is my smart lock motor struggling after installation?
A struggling motor can indicate excessive mechanical resistance, incorrect installation, or door and frame misalignment. Check that the bolt or latch moves smoothly and aligns correctly with the strike. Do not repeatedly force the motor against a mechanically restricted lock.
Should I hire a locksmith to install a smart lock?
Professional installation can be a good choice when the door is non-standard, significant modification is required, the existing lock is difficult to replace, or you are unsure about compatibility and alignment. For a straightforward compatible retrofit, DIY installation may be possible.
How much does smart lock installation cost?
The cost varies by location, lock type, door configuration, installation complexity, labour, and any required door modification or additional hardware. For an accurate current price, request a quote based on the specific smart lock and door rather than relying on a generic installation estimate.
What should I test after installing a smart lock?
Test the mechanical locking mechanism, every configured authentication method, auto-lock where applicable, emergency or mechanical backup access, and the lock with the door fully closed. The bolt or latch should operate smoothly without excessive resistance.
What should I do if the smart lock does not fit my door?
Stop the installation and recheck the manufacturer’s compatibility requirements. Confirm the door thickness, existing lock mechanism, backset, mounting dimensions, and other required measurements. Do not drill or modify the door until you have confirmed that the modification is supported by the specific product.
Final Takeaway: Smart Lock Installation
A successful smart lock installation starts before the first screw is removed. Confirm that the lock is compatible with your door, identify the existing locking mechanism, and prepare the correct tools and installation hardware.
After physically installing the lock, make sure the mechanism operates smoothly before completing calibration and digital setup. Configure the required access methods, test the lock with the door open and closed, and verify the emergency or mechanical backup access method where provided.
If the installation requires significant door modification, involves a non-standard locking mechanism, or the lock does not operate smoothly after installation, professional assistance may be the safer option.
The Smart Lock Installation Framework:
Measure → Verify Compatibility → Prepare → Install → Calibrate → Configure → Test → Troubleshoot
The goal is not simply to get the smart lock powered on. A properly installed smart lock should provide reliable access while its mechanical, electronic, and backup access functions work as intended.